Are Our Eggs Organic, Free Range, or Cage-Free? Ire over the Food Labeling Mire

Most of our friends and customers are concerned about where their food comes from, and some are concerned much more than others. In our age of industrial food production by big agribusiness, I am very concerned about it too! These concerns lead to questions from egg buyers about whether our eggs are organic, free range, etc. These questions always make me sigh, because I know that my answer to their short question is too long, and they probably don’t want to hear it all! Life is easier when answers come as a binary yes or no. Life is too busy, and too short, to hear a whole dissertation about whether or not the eggs are organic, especially when eggs are just one thing that we eat. This is the appeal of modern-day food labeling: keep it easy, I’ve got other things to do.

Industrial Egg Production vs Back Yard Egg Production
The industrialization of food production is a topic for a series of books, not a blog post, but I should say that I’m not an agribusiness hater. There are many reasons that large commercial producers operate the way that they do, and the main reason is consumer demand. Their consumers want a homogeneous product, available any day of the year, for the lowest possible price. Our eggs fail on all three counts! Our eggs are a variety of sizes, with the smallest being half the weight of the largest. Our shells vary in shape, color, and texture. Our hens lay on their own schedule, which means that our production has seasonal variations that include not laying at all sometimes. And as far as price goes, our current price is 2-3 times as much as the cheapest eggs around.

These variables would not be acceptable to an industrial producer, and they would not be acceptable to many consumers either. As such, industrial producers use techniques to smooth out the spikes. The chickens are all the same breed, and they live in laboratory conditions. They eat a carefully managed ration of food that is provided to them, and nothing else. Visitors must comply with strict biosecurity regulations to ensure that no outside microbes (good or otherwise) are admitted. The temperature and light levels are managed. Eggs are washed, inspected, and sorted by size. Homogeneous inputs produce homogeneous outputs. They are doing their job, and they are doing it well. The cost of eggs has fallen relative to inflation, this summer’s spike not withstanding.

Many things that might concern an educated consumer aren’t concerns to the industrial producer. It doesn’t concern them that the layers are usually terminal hybrids. This means that if you hatch the eggs of the usual commercial layer, you get a different breed of chicken from the mother. The only way to replenish the industrial layer stock is to buy more chicks from the big business that engineered them, and they likely have intellectual property rights to the stock anyway. The back yard producer is usually more concerned about sustainability, which means mating two of the same breed to produce an offspring of the same breed. The industrial producer isn’t concerned that the chickens are all the same type. Here’s an article about why we are, though that article doesn’t address the valid concern of genetic diversity and resistance to new diseases that may come along.

These are just a few of the differences, but I’m sure you see what I mean. I bring it up to say that a backyard producer like us is just marching to an entirely different drum than an industrial producer. So is it any surprise that we have a hard time fitting into the industrial producer’s food labels?

The problem with “us” using “their” labels
Some industrial egg producers serve the special markets like “organic” and “cage free.” This is probably good, because these products are made with more sustainable practices. But having said that, in most cases these producers are still approaching the business with the same laboratory mindset. They can take the USDA guidelines for organic production, check all of the boxes, and label the eggs accordingly. We would say that those chickens still don’t live a very good life though. We’re less concerned with checking boxes, and more concerned with keeping happy and healthy birds, which should in turn produce better eggs.

Here is a link to a nice description of some of the common egg claims, produced by the Humane Society. You’ll find that a producer can label eggs as “organic” even if the hens never see any green plants. They can be de-beaked. De-beaking is a “management” practice that makes it harder for chickens to injure each other when they have been housed too densely. Just like people, if you put too many chickens too small of a place, they will injure each other. Cutting off their beaks helps to mitigate the injury. We prefer to just give the chickens more space.

Organic chickens are required to have access to the outdoors, unless there are health reasons or environmental reasons for them not to. Is “potential interaction with wild birds” a valid health reason for denying outdoor access? We don’t think so, but I suppose that would be a question that may vary from one producer to the next. “Outdoor access” doesn’t mean rolling hills of green pastures. It can mean a hole in the wall covered by a fence. Maybe the roof opens up for an hour a day. There are many ways to satisfy the letter of this requirement and fail to satisfy the intent, at least as we see it.

We are not prepared to label our eggs as organic, because the USDA organic standards require that the chickens only eat organic food. We don’t control the food that they eat, because they are not confined. They can eat live or dead bugs, mice, snakes, voles, moles, or anything that they can catch. Sometimes the cat will catch a mouse and leave it in a place where the chickens will find it. We feed them kitchen scraps. Chickens are, for us and dozens of human generations before us, animals that eat things that we do not want to eat and turn them into things that we do want to eat. Any time I see a claim on an egg carton about the diet of the chickens, such as “vegetarian fed” or “no animal products,” I know that either those chickens were confined in a controlled diet environment, or the producer is exaggerating the claim. Neither of those is a good reason to buy those eggs. This is why you should not be persuaded by any claims about the diet of hens. Natural chickens are true omnivores that can and will eat anything that they are in the mood for, that they can reach. Chickens that are raised as vegetarians are chickens that are not given access to “real outdoors” to eat what they want to eat.

As you can see, it is nearly impossible for a finite list of requirements to create a happy chicken living environment. Similarly, just because we don’t comply with one item on that list doesn’t make us feel like our eggs are any less good or our chickens are any less happy than those in industrial “organic” production. We think about it this way- if you like our eggs but are concerned about the welfare of our chickens, get in touch and schedule a time to come visit them. We’ll provide the lawn chair. Bring a glass of lemonade if it is hot, and bring two if you are generous. Stay as long as you’d like, and decide for yourself if they are living the life that a chicken should naturally live! You’ll have a good time, they are very entertaining.

How do you feel about these issues? Feel free to leave a comment!

Rainbow Chickens? Why is There More Than One Kind of Chicken Breed Anyway?

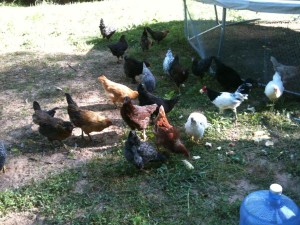
Sometimes egg customers want to know what kind of chickens we have. We refer to them as “Rainbow Chickens,” because we have several different types. Here’s an article about why there are different kinds of chickens, and why we have selected the ones that we have.Happy Rainbow Chickens
In the Beginning
The domestic chickens that we think of are said to be the great-great-manymoregreat-grand chickens of a particular type of jungle fowl. Over the many years, people domesticated them and began to selectively breed for traits that they liked.

A discussion about breeding and genetics should start with a discussion about the “birds and the bees” as they say. When a rooster and a hen love each other very much… well, let’s just skip to the part about genes. Hopefully everyone knows that when an offspring is created from the genes of two parents, the offspring will be similar in some ways to both parents, and different in some ways from both parents. What is less intuitive is how this relates to real life. For example, if you love Pink Lady apples and would like to grow your own (disregarding the trademark infringement issue) you might try planting the seeds that came from an apple that you purchased from the store.

Apple BlossomsThe problem with that strategy is that the seeds will produce offspring, not parents. You see, when the boy parts of an apple tree and the girl parts of another apple tree love each other very much, they get together and hire a bee (for the small fee of a drink of nectar) to carry genetic material from the boy parts to the girl’s flower. The site of the flower then becomes an apple, which carries the genetic material of the offspring in its seeds. That offspring will be a new-to-the-world apple. This is why there are anywhere from 7500 to 40,000 different named apple varieties, depending on who you ask.

When it comes to people and chickens, the same is true. Would you expect that your best friend’s kid would grow up to be your best friend also? Maybe, or maybe not. You’d expect that your best friend’s kid might have some similarities to your best friend, or at least the UPS guy, but they aren’t going to be identical. The kid might be very awesome, or might be a total jerk. This is where the apple analogy falls away from the discussion, because apple trees can be vegetatively propagated, meaning that a cutting from one tree can be grafted to produce a genetic clone of the parent. So far, our society has not considered it ethical to apply this technology to humans. The verdict is still out on the public opinion of cloning domesticated livestock. Industrial producers who strive for a consistent product tend to be quite in favor of it.

Getting Back to Chickens
We humans use chickens for several purposes, and different chickens have different traits that better suit them for each of those purposes. The traits are often mutually exclusive. For example, a chicken that is a very good egg layer is probably not going to be as good of a chicken to eat. The egg layer is going to have a slim body type, sending more of the inputs into egg production and less into increasing body weight. The meat bird is going to look like a body builder, and cluck with a deep voice. That case seems obvious enough, but there are plenty of other traits that matter too. For example, a producer who keep a chicken in a giant building with 19,999 other chickens would prefer that the birds be as inactive as possible. If those chickens are walking, scratching, flapping, or playing cards, they are burning calories that have to be replaced by food. Food is neither inexpensive nor free. That activity increases the temperature and humidity, which is insignificant until it is multiplied by 20,000. Then those must be mitigated by systems that are priced similarly to feed. He wants a bird that will just sit there, eat, and convert as much of that food as possible into meat.

In contrast, someone who has a free-range chicken wants that bird to be active. It needs to be out in the yard scratching, digging, and looking for bugs to eat. Naturally-occurring insects are both free and inexpensive, and when chickens are eating them, they are getting a diverse diet with nutrients that may not be found in the feed that they may have access to. And they are eating less of that feed! The free-range chicken needs to be able to defend itself, getting out of the way of predators.

Apply this concept to each of the hundreds of traits that you might like to think of, such as egg shape, shell color, feather type and color, color patterns, tendency to want to raise offspring or not (go broody, as we say), body size, hardiness (disease resistant without medication), skin color, foot color, temperament (tame vs wild), and you can see that there are many things to choose from. What about the ability to tell hens from roosters on the day that they hatch? That sure could be handy. The more of these traits that a breeder selects, the less likely he is to be able to excel in all of them.

Say that a breeder wants a flock that is active and hardy, with good egg and meat production, with gold and black feathers. He can do that; it might take a few decades, but he could produce his ideal chicken. It would not be a breed listed in the APA’s Standard of Perfection, but he might try to change that. It would be almost certain that while his chickens would be better at laying eggs than a specialized meat bird, and better at meat production than a specialized egg bird. It would be equally certain that they would not be as good at meat production as a specialized meat bird, etc. You get the idea.

Getting to the Standard, Named Breeds
When we tell you that we have two Rhode Island Red hens (as of 6/2015) for example, you know what that means. The Standard of Perfection has a listing for that breed, which includes a detailed description of the type. Folks who go to poultry shows will bring the bird that they think most conforms to that description, and the judges will bestow awards on the birds that the judge feels most conform. Then breeders can ask higher prices for the eggs from those award winners. If, for example, a breeder knows that his birds generally conform very well on feathering and foot color, but fall short on comb type, she might make some changes. Maybe she’ll get in touch with another breeder who has birds with more conforming combs, and hatch some of his eggs. Over time, she can use a mixture of art and science to produce a line of chickens that will win awards for conforming to the standard.

This is not what we do. Not that we have anything against those who do, it’s just that breeding and showing is a separate hobby. Our late friend James Keeton was able to make significant money at it in the early 1900s in fact. Many of our chickens are what we call “easter eggers,” because they are descendants of a few different breeds. They have been bred with emphasis on egg laying and hardiness traits instead of conformation to a standard. As such, they don’t really have an official breed name.

Rainbow Chickens, Finally
We refer to our flock as “rainbow chickens.” Our flock perfectly serves our own priorities, which include that each member is, for example:

  • Active and foraging
  • Hardy and healthy
  • Tame enough to handle
  • An active layer
  • Comfortable in our climate
  • Not a risk to the others

None of those priorities lead us to a particular breed, or even a named breed. In fact, our preference is that each egg carton has a rainbow variety of egg types and shell colors, so an additional priority is that our chickens come from different breeds. As of today, half of our flock includes Barred Rocks, Buff Orpingtons, and Rhode Island Reds. The other half includes the easter eggers, one mixed rock that we call “dirty bird,” one mixed Black Ostralorp and Welsummer, one half welsummer and half easter egger, etc. We have two roosters for predator mitigation. One is half easter egger and half Dark Brahma, and the other is half of that mix and half Welsummer and Black Ostralorp.

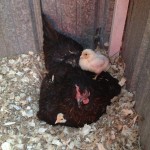
Broody Hen with ChicksMany of our mixed breeds came from our own hatchings. In fact, if we were to only sustain our flock by hatching our own eggs, our flock would eventually homogenize. It might take several decades, but they would settle in as a previously unknown breed, all with similar egg colors (olive green), and who knows what kind of feathers. These little mongrels would still do what we prefer on the whole, especially if we were to only hatch the eggs of the parents that we liked, but they would definitely not be a recognized breed.

We keep chickens primarily for entertainment and education, with egg sales just being a means to offset the cost of feed. (There are certainly more productive ways for us to make money!) Since we enjoy our chickens more when we can appreciate them as individuals, having different types also allows us to more easily keep track of which one is which. So having the rainbow also meets our needs in that sense, making the flock more interesting. Breeding and perfecting a particular line of chickens is hard work. The chickens almost certainly have to be confined, or at least separated from each other somehow. For us, it’s just not worth the trouble, because that’s not what we think of as fun.

There you have it, more than you probably ever wanted to know about why we call the hens at the Happy Egg Farm “Rainbow Chickens.” Leave us a comment about what kind of traits you like to see in chickens!
30-Gallon Barrel and Pipe Automatic Chicken Feeder

We saw a few great ideas on Youtube about using PVC drain pipe parts to make a chicken feeder out of a bucket or barrel. I found a good local source for 30-gallon blue barrels that came from the soda bottling plant. Just as with the many 55-gallon barrels that I have used for rain collection, I don’t buy used barrels unless I am confident about what they were last used for. In this case it was easy to tell, since the barrels still had the markings from the soda bottler, and they had a distinct smell of Mountain Dew.
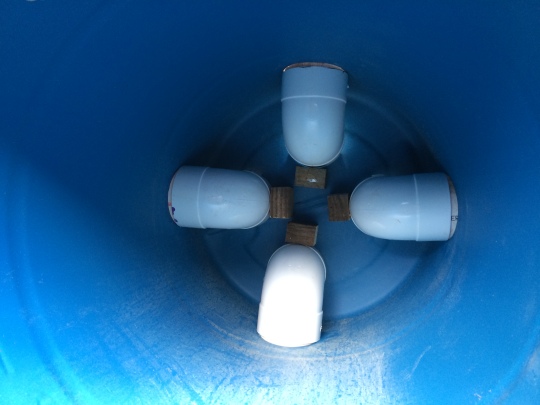
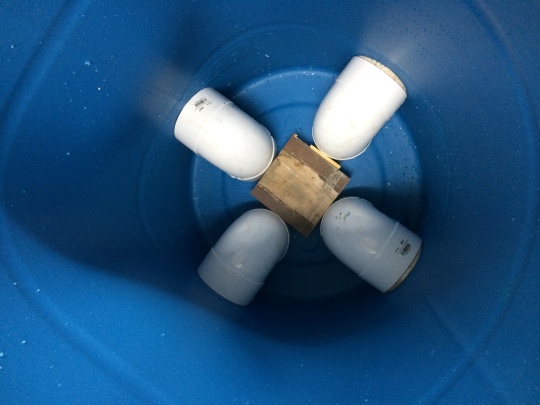
The theory is to set the elbows so that they stick through the sides of the container, requiring the chickens to stick their heads into the 4″ hole to eat. This should minimize waste and make it much harder for mice and other critters to get to the food.

Looking Down Into the Barrel

Looking Down Into the Barrel


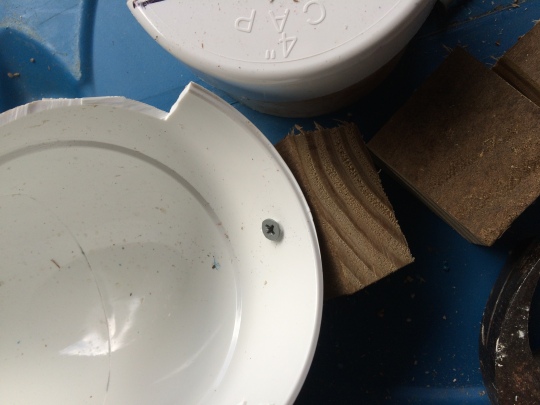
Each elbow is attached to a block of wood with a screw like this one:
Attachment Screw

Attachment Screw


And then I ran a second screw up from the bottom of the barrel into the same block. For a second feeder I used a slightly cleaner method of one block to serve all four pipes.
A Cleaner Option

A Cleaner Option


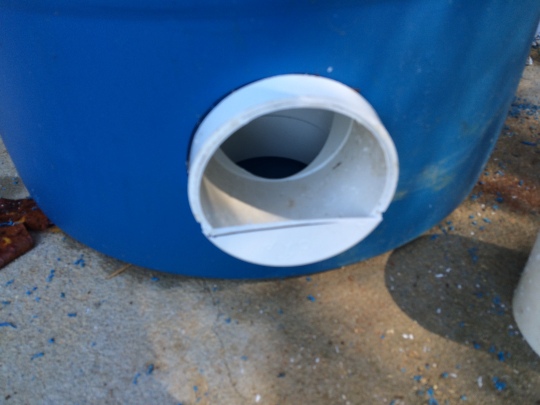
I used a 4-1/4″ hole saw to make the holes in the barrel. This is the outer diameter of the drain pipe, though not the outer diameter of the flange on the elbow. This made it necessary to use a 3-inch long piece of 4-inch pipe to protrude through the barrel.
Before attaching the elbows to the wood, I cut a section of the lower flange off to allow the feed to flow into the opening. I had to guess about what size to use, and went with about an inch on the first feeder. This proved to be not quite enough, especially for a pelletized feed. 1-3/4 inches worked a little better.
The barrels that I purchased were “closed top,” meaning that the only way in or out is through the small bung hole. To build the feeder I had to cut the top off with a reciprocating saw, just as I usually do when making rain barrels. This left us with a need for some type of top. What we came up with was a storage cover like this one:
Plastic Barrel Top

Plastic Barrel Top


The cover is about 3″ larger in diameter than the top of our barrels, so it is a pretty loose fit. On one feeder I secured it with a bungee cord, but on the second I just used a brick on top. You can find the covers here.
One idea that we tried, but do not recommend, is to put a lip on the outside of the short length of pipe, like this:
Don't do this!

Don’t do this!


We thought this might reduce waste further. Instead it created a place for young ones to get stuck. One little hen that we named “Chuck” because she kept getting stuck eventually died because we didn’t realize that she was in there.
Chuck is too small to use this feeder safely!  She kept getting stuck.

Chuck is too small to use this feeder safely! She kept getting stuck.


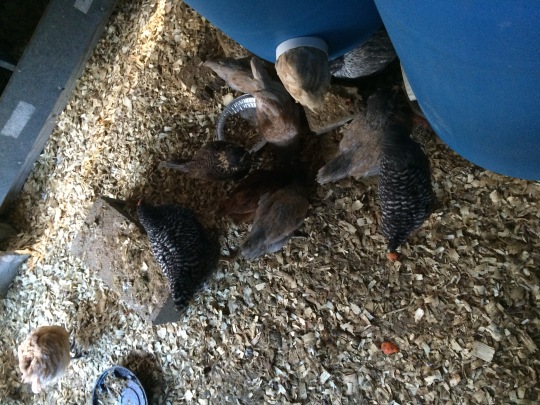
If the chicks are small enough to get both of their feet into the elbow, then they are doomed. We have also had a chick get stuck on the feeder with the larger bottom opening when it ran out of food. She got into the elbow and stuck her head through the slot sideways, which she wouldn’t have been able to do if the feeder had been full. I would say that the safest bet is to keep these feeders available for full-grown birds, and not use them with chicks.

Coop Door Positioning

Chicken Ramp

Chicken Ramp

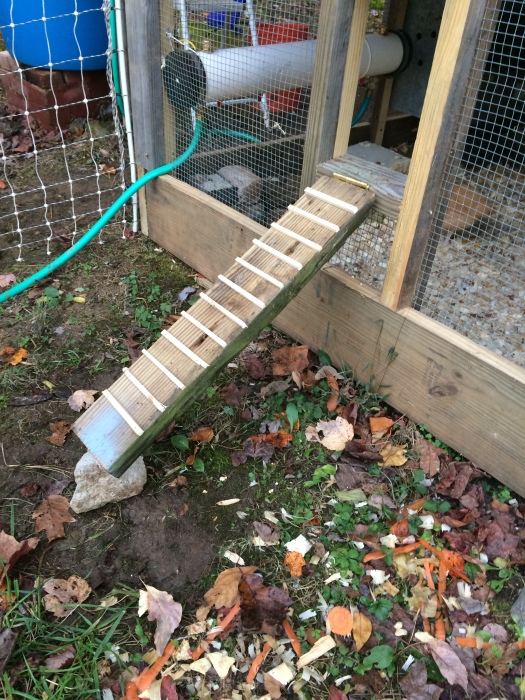
In some places the door that the chickens use to access the coop is called the “pop hole.” We learned with our prior houses that having this door elevated a foot or so off the ground has several advantages. I should say that it’s no problem for a healthy chicken to hop up to get through the door, so there aren’t really any disadvantages. By having the door elevated, the bedding litter on the ground say out of the opening. The height provides one more level of defense from predators and pests, at least from short, non-climbing ones. If the chickens use the little ramp that we made for them, we find that they track less mud into the house on rainy days. The ramp is hinged so that we can fold it up as an extra door barrier. The primary door is a piece of 1/16″ thick aluminum that is automatically operated on a vertical slide.
Ramp in Place

Ramp in Place

Roosts

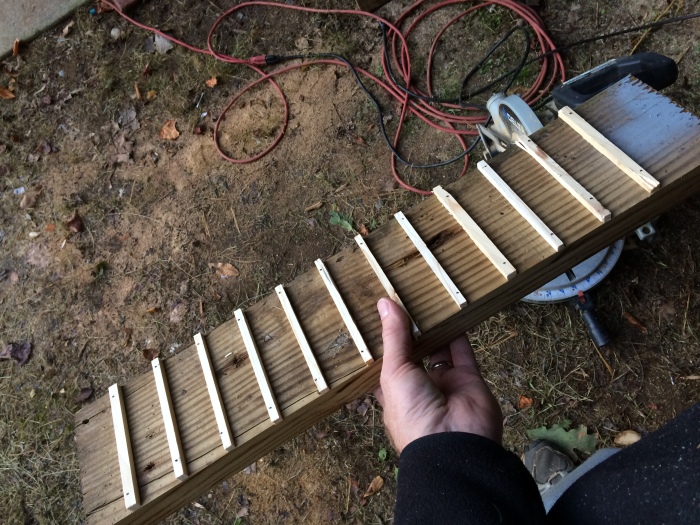
This angle was too steep, making the poles too close together.

This angle was too steep, making the poles too close together.


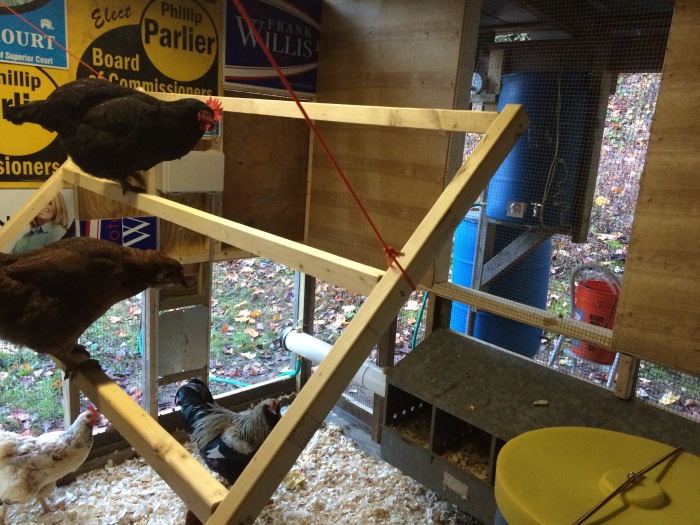
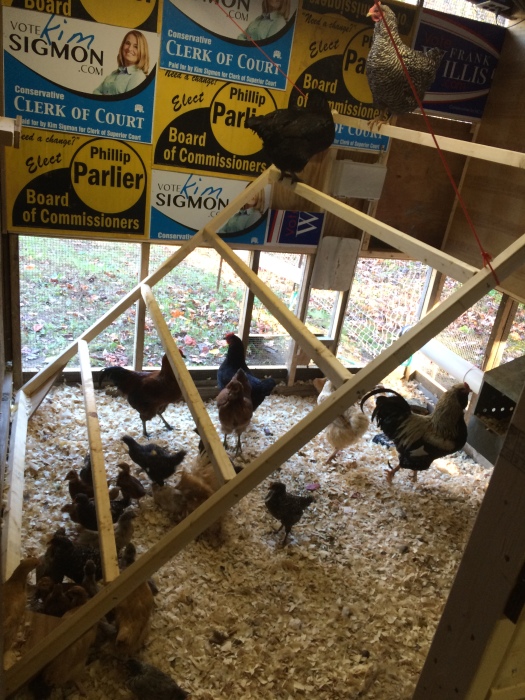
The roosts in our coop are slanted so that the girls can more easily get on them, but notice that they are attached to the wall on the low end of the slant instead of the high end. This allows us to fold the whole contraption up against the wall if we need better maneuvering space in the coop, such as for a periodic shoveling. The bottom of the rack is attached with two regular interior door hinges, and ropes tied to the ceiling determine the angle when the roosts are lowered. If the angle is too steep, then the rungs will be too close together and the birds will poop on each other. If the angle is too narrow, then the rack takes up too much space in the coop.
Roost Angle

Roost Angle

Commercial Nest Boxes, Ideal Nest Box Height

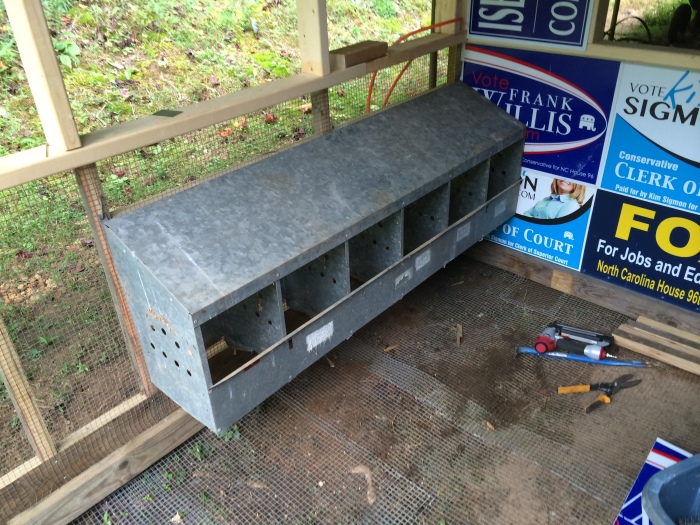
When our neighbors moved away, they gave us a nice metal nest box with plastic bottom liners. We built this box into the new house, with access doors on the back.

Metal Chicken Nest Box

Metal Chicken Nest Box


View from the outside

View from the outside


This box is positioned quite strategically. First, we have it positioned on an outside wall so that we can easily collect eggs. Second, the height is such that it is lower than the lowest roost. This is to make it an undesirable place to roost (sleep, that is) for the girls. Notice that it isn’t on the ground though. We wanted for the chickens to have access under the box, so that they can keep that area free of bugs, snakes, and other undesirables. You can also see in the second nest box picture above that there are two access doors. This is so that we can more easily control any birds that might be in the nest box when we are collecting. A smaller opening is easier to block than one as large as the whole nest box back.

Using Hardware Cloth Instead of Chicken Wire

We learned several lessons from our first chicken coops, and we designed our new house to be more safe and comfortable for the girls, and less demanding for us to service and maintain. Our recent property expansion included a storage building, and rather than make the coop a stand-alone structure, we decided to build it as a temporary enclosure on the porch of that building.
This strategy spared us from having to build one wall and a roof.
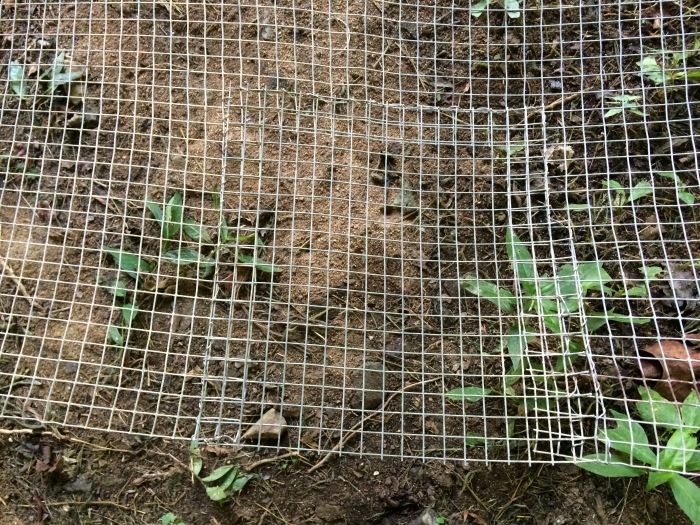
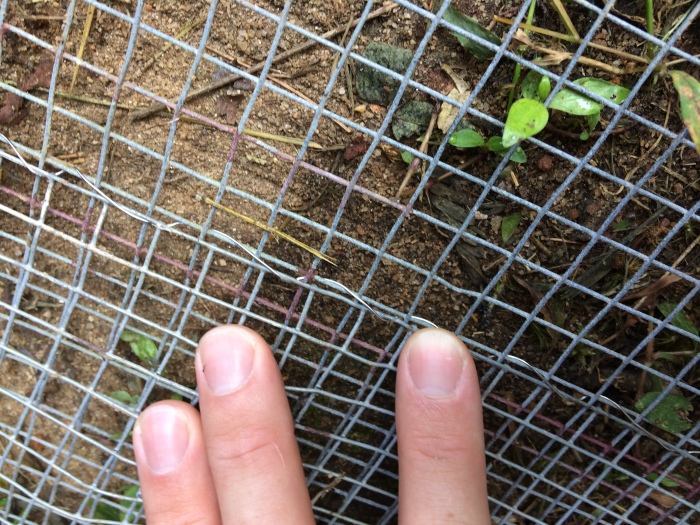
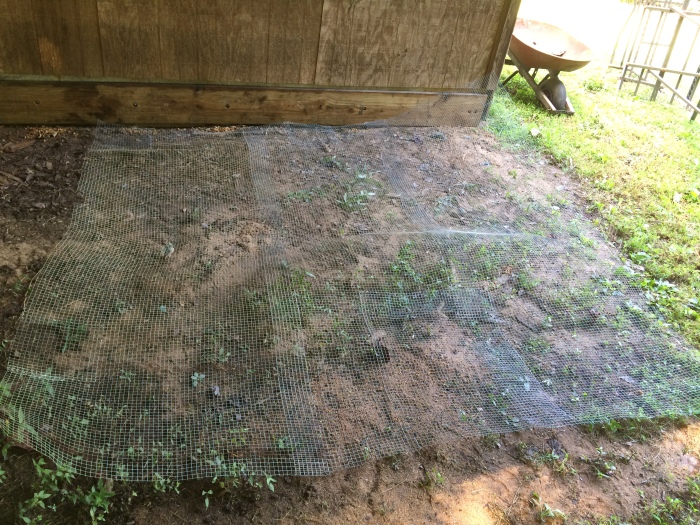
Even with our first chicken houses we knew that rodent and pest protection were as important as predator protection. We used 1/2″ hardware cloth in those houses, which was effective against mice. A larger-than-usual flood destroyed one of our old houses, but I was able to salvage enough hardware cloth from it to make a floor for the new coop. There were a few damaged areas in the large pieces, so I cut those areas out to make clean rectangles, then attached slightly oversized patches with stitches of stainless wire. It took me about half a day to make the single large floor piece this way, though it would have gone a little faster if I had been using new hardware cloth instead.

Hardware Cloth Patch

Hardware Cloth Patch


Here's more detail of how the stainless wire threads through the weave of the hardware cloth

Here’s more detail of how the stainless wire threads through the weave of the hardware cloth


Chicken Coop Floor Protection

Chicken Coop Floor Protection


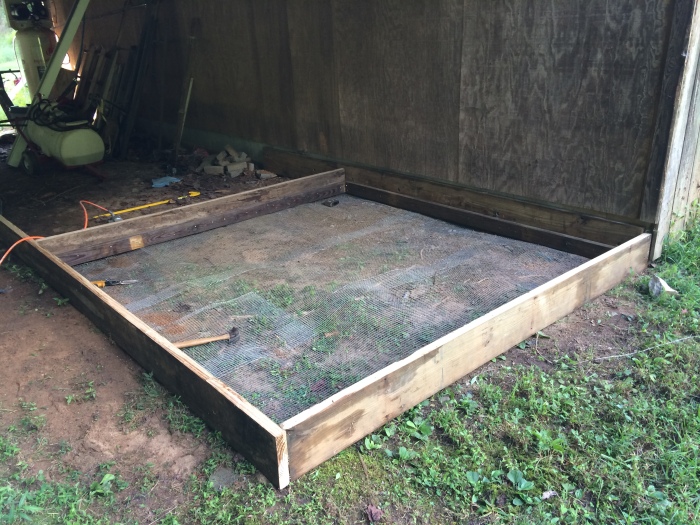
For the next step I made a box out of treated lumber that we salvaged from our former driveway bridge.
In this picture the hardware cloth is just resting under the lumber, not permanently attached yet.

In this picture the hardware cloth is just resting under the lumber, not permanently attached yet.


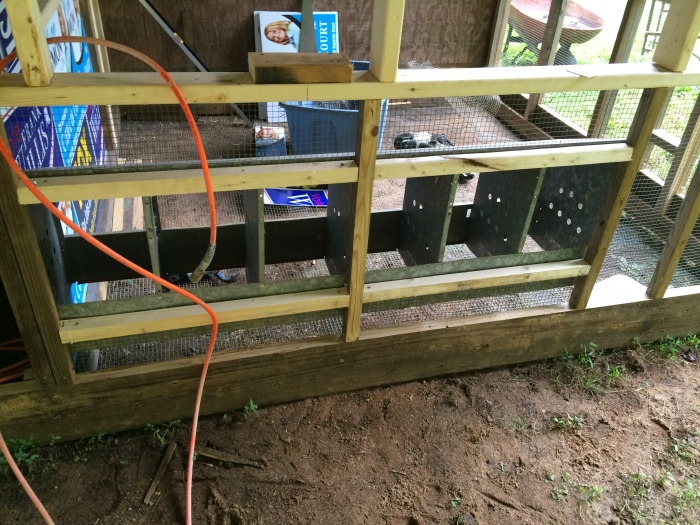
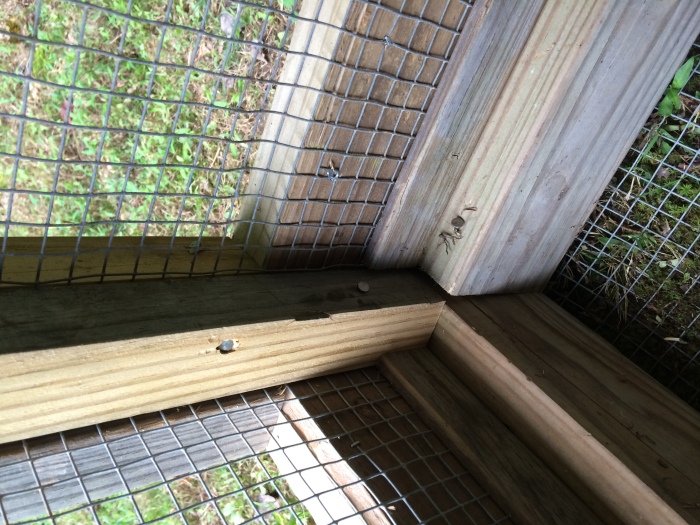
The concept for this house is to have hardware cloth for the bottom few feet, and siding from there up. We live in a moderate climate, so drafts in extreme cold are less of a concern than having good ventalation. To help make the coop mouse-tight and more predator resistant, all of the areas where hardware cloth meet the wood are made with a sandwich of wood. For an example, see the picture below. In that picture, the left side of the frame is “up” and we are looking at the floor of the coop on the right. The floor piece bends up to fit between the outermost 2×8 and the inner 2×4. The 2×2 that runs vertically sandwiches the two lower wall pieces. The bottom of the wall hardware cloth is sandwiched between the 2×8 and a piece of 2×3/8 lath that I ripped on the table saw. All of the wood near the ground is treated. There is some concern about the chickens having access to treated lumber, but those concerns are overridden by the need to have the house stay together. We use a composting deep litter of wood shavings on the floor that is several inches thick, so the 2x4s pictured below are almost entirely buried.
Mighty Chicken Fortress

Mighty Chicken Fortress


Hardware Cloth Top Detail

Hardware Cloth Top Detail


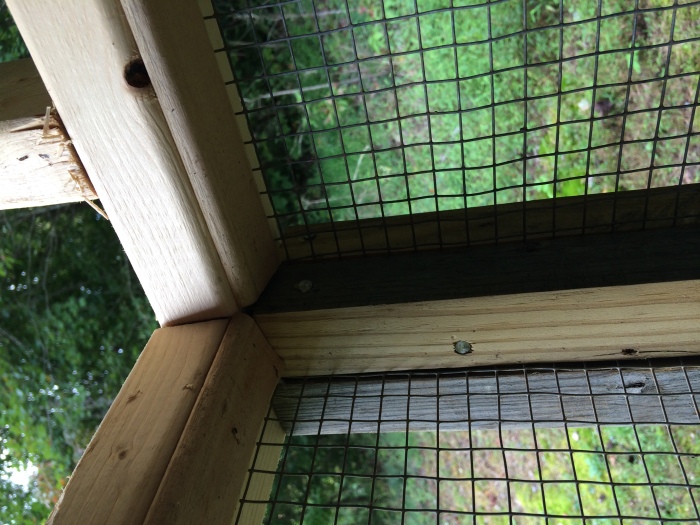
The second picture shows how the hardware cloth terminates at the top of the opening.

Rethinking the VSB Opener

After years of success with the automatic chicken coop door opener from Europe, it was time to build are new expanded chicken house. This was a great opportunity to refine the system a little. The two goals were to consolidate the timer and actuator into a single box, and convert the two to a single, lithium battery power source. Update: experience showed that the batteries did not last long enough. I speculate that this was because of the litte power supply circuits. I removed the batteries and connected a wall-wart type of AC adapter instead, which has been working fine.

Here is the result:
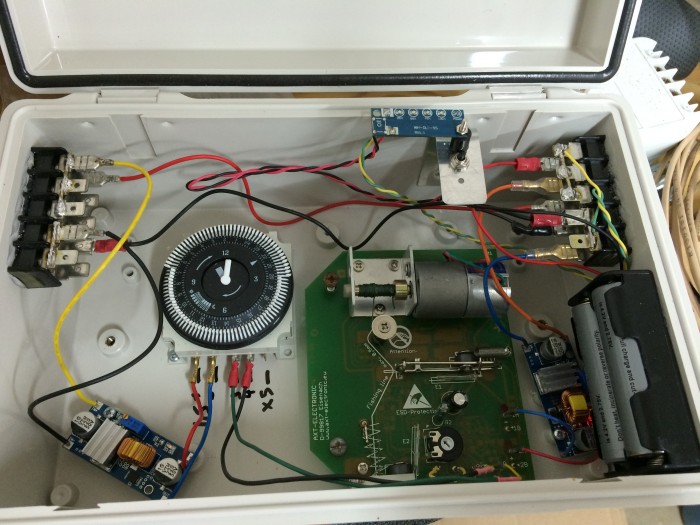
Combined chicken coop door opener and timer
Here’s a tour of the components. You probably recognize the VSB circuit board and mechanical timer. These days they ship a solid-state timer, but I think it is a drop-in replacement. There are three other circuit boards. The one in the top, middle, near the black push-button switch, is a battery status indicator. When the switch is closed, there are LEDs that light up to indicate the battery charge level. The other two circuit boards are little adjustable power supplies from China via eBay. They are very simple to use- volts in on one side, volts out on the other side. The tiny brass screw on top of the little blue component is the adjustment. As shipped, the screw is set for a high output voltage, so it took around 15 counter-clockwise turns to get it into the adjusting range. I adjusted the one on the left to 1.5 volts and connected it to the timer, then adjusted the one on the right to 6 volts and connected it to pins 1 and 2 on the VSB. I shorted pins 5 and 6 as before with a jumper (to bypass the on-board optical sensor), and connected pins 3 and 4 of the timer to pins 3 and 4 of the VSB. There are a few extra slots on the terminal strips because I’m planning to use the same supply voltage to power our water level monitoring system on the rain barrel. These slots will also make it easy to add another two or three lithium cells in parallel, should it turn out that the battery duration is not sufficient.

The VSB Chicken Coop Automatic Door Opener

Pastured-chicken keepers know that chickens will normally return to a coop to sleep, and since many of their predators are nocturnal, we can keep them safe by simply closing the door to their coop. Manually closing a door each night and opening that door the next morning may sound fine to someone who is used to keeping dogs, but we are cat people, and not really interested in that sort of commitment.
The alternative is some sort of motorized coop door on a timer or daylight sensor. These days there are several to choose from, but a few years ago when we first started looking for a system, there was really only one viable option, the VSB system from Europe. We used that system as-delivered with a mechanical timer for a few years, and it worked out well.
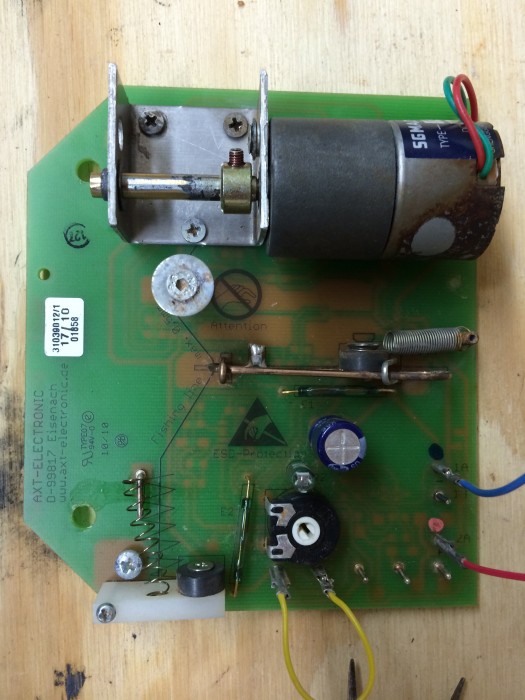
The actuator system is contained in a single rain-proof plastic enclosure with a transparent cover. The components in that box operate on four AA alkaline batteries. The door motion comes from a small geared motor that winds a very durable thread/string around an axle. The motor/gearbox is mounted to a circuit board that features a light sensor, a potentiometer for adjusting the light sensor, input pins for an external light sensor or timer, and limit switches.
VSB Chicken Door Opener Circuit Board and Motor
The design is very clever. Instead of using mechanical limit switches that would wear out and be susceptible to environmental challenges in the coop, the system uses non-contact reed switches that are operated by magnets. These are visible in the photo running vertically just to the right of the pivoting plastic arm on the lower left, and running horizontally between the sliding switch in the middle of the board and the large blue capacitor.
The connections on the lower right corner are as follows. Pins 1a and 1b are electrically common, and go to the negative side of the supply voltage at the AA batteries. Pins 2a and 2b are also electrically common with each other and go to the positive side of the AA batteries. The remaining pins across the bottom are referred to in the instructions as 3, 4, 5, and 6. In the photo, 5 and 6 are shorted with a yellow jumper. This jumper causes the circuitry to bypass the optical sensor (located just below and to the left of the blue capacitor, and just above the potentiometer. The potentiometer is where one would adjust the light sensor, and as I understand it, pins 5 and 6 could also connect to a remote light sensor. When the circuit is closed, then the door is closed.
Pins 3 and 4 are connected to the timer in our setup, though in the photo they aren’t connected to anything. When those pins are shorted, the door will close. When the system is in “door closed” mode, the motor will unwind the string until the sliding switch in the center of the board slides to the right. This is an indication to the logic that the door is now resting on the bottom of its track, since the string is slack. In door open mode, the motor winds up the string until a knot in the string hangs up in the small hole in the piece of white plastic on the lower left side of the board. When that knot hangs up in the small hole, the plastic arm lifts, and the magnet opens the reed switch.
Our opener worked well for the first few years. We would have to periodically adjust the timer to account for seasonal changes in the length of the day, but that was to be expected. The batteries lasted a long time- at least several months, and perhaps a year at times. It was slightly inconvenient that the two systems used different batteries, but not a big deal.
All of that worked well until our big flood in the summer of 2013. The system was submerged while powered for some time, and I didn’t have any expectations for it to work again. I removed the expensive parts from our wrecked chicken coop and tossed them in a cardboard box for over a year, when our new chicken house was ready for a door actuator.
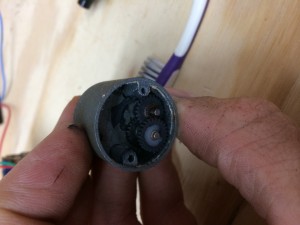
The circuit board is potted with some sort of clear varnish, so I had hopes that maybe the circuitry was OK. I removed the motor from the board and took apart the gearbox, cleaning each gear and packing with fresh grease. I cleaned and lubricated the motor, which seemed fine.
Gearbox Housing
Gears
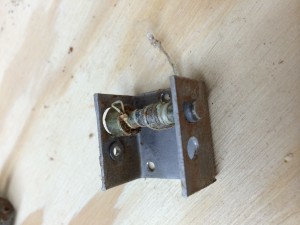
Spool
With 6 volts applied to the motor leads directly, it worked great. But when I reconnected the motor to the circuit board, I couldn’t get it to work. There was probably some water damage to the circuitry after all, which is certainly not a surprise considering the exposure. I wrote to the manufacturer in Germany to see if they could suggest any further troubleshooting or if they could supply any parts, and they offered to send a new circuit board and motor for $65 with shipping. This was an appealing option, since the new system all together would have cost closer to $200, and I really only needed the board itself. Since I was starting fresh with the new chicken house, I decided to make a few changes to the door opening arrangement, and I’ve made another entry to describe those changes here.